
My Thoughts on Using Epoxy Resin
Lately I've been curious about adding resin to some of my paintings, especially to create realistic water drops and glossy details. So I finally decided to give it a try.
For my first experiment, I used the LET'S RESIN Epoxy Resin Kit for Beginners, and I was pleasantly surprised by how simple it was to use.
Getting Started
The process was easier than I expected.
- Mix equal amounts of resin and hardener.
- Stir them together thoroughly until they become completely combined.
- Pour only a small amount at a time. It's much easier to control where the resin goes this way.
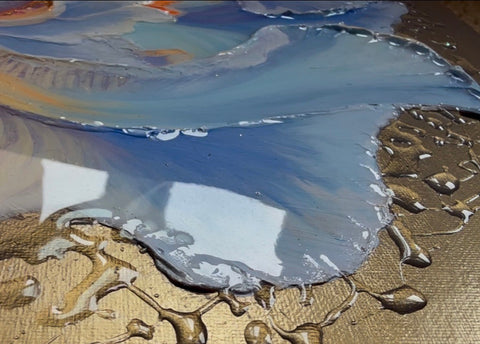
For the water drops on my iris painting, I simply used the small measuring cup included in the kit. Creating the droplets felt very intuitive, and I could easily control their size and placement.
I also mixed a little glitter into separate cups of resin and poured it only into the areas where I wanted extra sparkle.
Although this resin is described as low odor, I still recommend working in a well-ventilated space and always wearing protective gloves, since uncured epoxy resin can be irritating to the skin.
My Results
Iris Painting
I was surprised by how much the resin deepened the colors.
The blues and purples became richer, and the surface gained beautiful depth. One thing I didn't expect was how bright the orange paint became under the resin. It was much more vibrant than I wanted, so after the resin cured, I added a little more paint on top to soften the orange areas.
The resin water drops also caught the light beautifully and added another layer of dimension to the textured surface.
Creating the water drops was easier than I expected. I simply used the small measuring cup included in the kit, which has a narrow spout that made it easy to pour small amounts of resin exactly where I wanted them. Because the resin is thick and syrup-like, it naturally forms rounded droplets. The small silicone stir stick included in the kit was also very helpful. I used it to guide the resin, adjust the shape of individual drops, and create smaller droplets with more control. My only recommendation is to practice on a scrap canvas or another surface first until you get a feel for the size and flow before applying it to your finished artwork.
🎥 A Closer Look at Creating Resin Water Drops
Pomegranate Painting
My pomegranate painting received a full resin coat.
I really loved how polished and luminous the painting became. The colors looked deeper, and the glossy finish made the fruit feel almost real.
At the same time, I realized I missed something.
Because this painting was created with oil paint, the resin covered the natural brushstrokes and subtle surface texture that I enjoy seeing. While the glossy finish is beautiful, it changes the character of the painting.

What I Liked
- Very easy to mix and use.
- Beautiful glossy finish.
- Colors become richer and more saturated.
- Creating resin water drops was easier than I expected.
- Fun to experiment with glitter and special effects.
What I Didn't Like
- Resin changes the appearance of oil paintings by covering the natural brush texture.
- Some colors become much more vibrant than expected.
- Once the resin cures, making changes becomes more difficult, so it's worth testing on a practice piece first.
Final Thoughts
Overall, I'm really glad I tried resin. I don't think I'll use it on every painting, but I can definitely see myself using it for selected pieces where I want extra depth, glossy details, or realistic water drops.
Like any new medium, it's another creative tool—and now I'm excited to keep experimenting.
Have you ever experimented with epoxy resin? I'd love to hear about your experience or answer any questions in the comments.
Comments (0)
There are no comments for this article. Be the first one to leave a message!